
Happy February! I’m back again to continue our journey along the first several months of Blightmare development. Today we’re going to bounce around a bit in order to cover the story of how we integrated character animation into the game. Enjoy!
Walk Before You Run
The first step to a fully animated player is to get the animations into the game at all. Fortunately this was pretty easy for us because the tool that our animator Andrew decided to use is widely used in the industry and has good plugin support for Unity. I grabbed an export from him in the form of a big blob of text describing the animations and a collage of images called an atlas that neatly packs all the character art together. The Unity plugin automatically recognizes these things and provides a simple interface to add the animation onto an object in the scene. That’s all we need to do to get something up and running. In the video below, I’ve already added a simple transition between two animations: “idle” and “running”
Animations and State Machines
A character like Blissa has several animations as you might imagine. Keeping track of which animation needs to be happening at any given time can be a little bit tricky. Often there’s a relationship between mechanics or specific logic and the animation that should be displayed. Using the example above of idle and running, there’s specific code to check if the player is inputting a desire to move in a direction and when that is the case, we can start the run animation. As soon as we stop running we go back to idle. Not so bad. But now lets add jumping and bouncing into the mix. Blissa has different animations for these actions and there’s a third one that we implicitly added by allowing her to be off the ground: falling. Let’s try to work out how these are going to fit together.
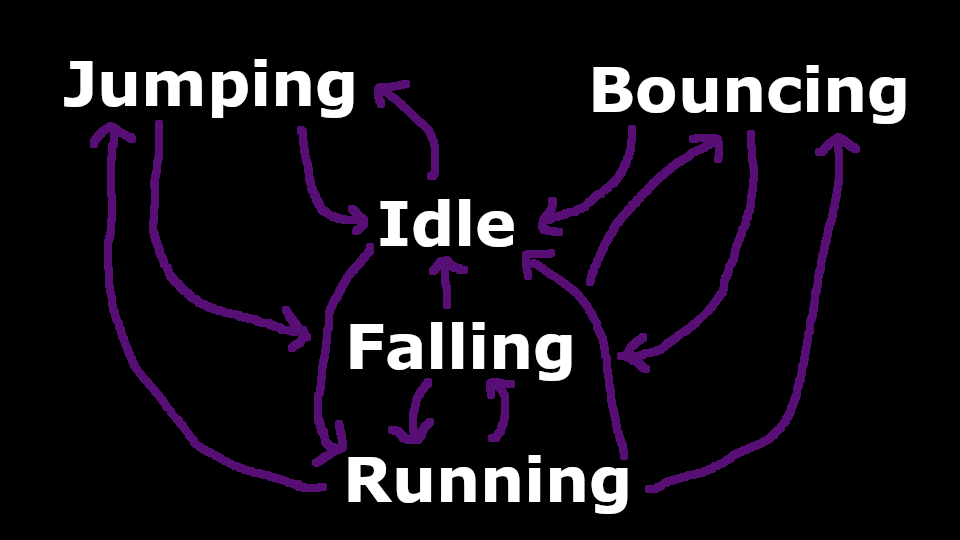
Making a flowchart for something like this is a great way to start piecing things together. It is convenient to think about each concept as a distinct state that Blissa can be in: Idle, Running, Jumping, Bouncing, and Falling. The animations are setup so that she should only be in a single state at a time which makes things a bit easier. Let’s break it down by source state to see where we can transition to.
If we’re Idle we can Run or Jump so we have Idle -> Running and Idle -> Jumping
If we’re Running we can Stop, Jump, Fall, or Bounce so we have Running -> Idle, Running -> Falling, Running -> Jumping, and Running -> Bouncing
If we’re Falling we can Land or Bounce. When we land we might immediately be running, so we have Falling -> Idle, Falling -> Running, and Falling -> Bouncing.
If we’re Jumping we can Land or Fall. Same choice with landing so we have Jumping -> Idle, Jumping -> Running, and Jumping -> Falling
Finally if we’re Bouncing we can Land or Fall. Again same landing condition so we have Bouncing -> Idle, Bouncing -> Running, and Bouncing -> Falling.
This is beginning to be complex! Thinking about the states and transitions to other states however provides a really nice organizational method. It turns out that this is a very common practice in programming of all kinds, but controlling animations is a particularly useful application. The term for this collection of states and transitions is a State Machine. It helps significantly to visualize the state machine to see the big picture:
This is common enough that Unity has a very powerful built-in system to create and use state machines through a visual editor. Unfortunately, Spine animations in Unity did not work very well with the built-in state machine functionality so we had to create something from scratch. What we came up with didn’t have a fancy interface on it, but it did make sure that we were able to change the animation names without having to change the whole state machine which is something that I’ve learned the hard way a few times: make sure your art is configured independently from your logic and you will have a much better relationship with your artists! Now that we have our state machine setup and the animation names configured, we can take it for a spin:
Now we’re really getting somewhere! Okay, now we just have to add in the net and all the basic animations will be setup – you might remember dragging from last week but that was not a priority for the first demo that we were building so it wasn’t included in this animation pass. The net has 2 different animations for swinging: in the air and on the ground. That’s easy enough to add to our chart though: Idle and Running can now both go to Ground Swing while Jumping, Bouncing, and Falling can all go to Air Swing. There’s a slight edge case here when you hit swing on the same frame that you also start bouncing or jumping. For now, we’ll just decide that if that happens you will do the Air Swing – but these are the kinds of issues that crop up all the time and ruin the otherwise nice mental models of the game logic.
I hooked up these new states and their transitions and added the appropriate hooks in the game logic to transition when the net started to swing, and immediately realized that it wasn’t this simple. Swinging the net was a priority animation. It had to run to completion no matter what other state you might end up in – unless you captured something of course. There are a couple of ways to handle a mechanic like this, and for this implementation I decided to introduce the concept of state layers. The idea being we would essentially have multiple state machines running at the same time, but the higher layer could take precedence over a lower one. In this case we had a Net Swing Layer and a Movement Layer. If the Net Swing Layer was in any state other than Not Swinging, it would be in full control over the animation being played. As soon as the swing was completed and the Net state machine transitioned into inactive, we would pretend like there was a transition into whatever state the Movement Layer happened to be in at the time. This allowed the character to resume the correct animation without having to specifically write code for all the transitions between different net swings which is a really big win. Here’s a video that shows the net swinging along with some updated character art and a sneak preview of what our level editor was producing:
Speaking of the editor, we are going to be doing a series dedicated to the reasons behind making an editor at all – we could just use Unity as the editor – and some of the choices that we made while building it. While I was searching through our discord for these early gameplay demo videos, I came across the first playable build that we ever made. This was shown at GameSlice in London, ON. I recorded a playthrough today so that you can all see how bad at video games I am. Enjoy!
Thanks for reading! If you like what you see here or are interested in the game, Wishlist Blightmare on Steam to stay up to date!