
Hello! I’m Tom, one of the programmers on Blightmare, and today I will give you a very quick overview of how we build the terrain for our Blightmare levels.
The terrain is actually pretty simple. We start out with an empty rectangular grid, and the level designers can fill in certain grid squares with terrain tiles. Each grid square is either completely filled or completely empty of terrain.

Our editor tool automatically selects one of a number of tile images based on how the tiles are connected to each other. Andrew drew a whole bunch of individual terrain tiles, as seen below.

To determine which tiles can be placed next to each other, we defined a set of rules and tile classifications. First we need to classify each tile image based on what connections it has to neighboring tiles. We do this by defining a bit mask for each tile where a 1 bit indicates that there is a connection on that edge to an adjacent tile in the grid.
/*  ___________________________________
 * |           |           |           |
 * | NW (0x80) | N (0x40)  | NE (0x20) |
 * |___________|___________|___________|
 * |           |           |           |
 * | W (0x10)  |   N / A   | E (0x08)  |
 * |___________|___________|___________|
 * |           |           |           |
 * | SW (0x04) | S (0x02)  | SE (0x01) |
 * |___________|___________|___________|
 */
We then take that bit mask and classify the tile into one of several different types. The following is an example of how we classify our upwards facing tiles. We do this for each of 47 different classifications for tiles that face up, down, left, right, the four corners, end caps, vertical and horizontal sections, single tiles and interior tiles. It’s quite a lot of code to get them all.
// * 0 *
// 1 x 1
// 1 1 1 (Up_0011)
case 0b00011111:
case 0b00111111:
case 0b10011111:
case 0b10111111:
    return TileType.Up_0011;
// * 0 *
// 1 x 1
// 1 1 0 (Up_0001)
case 0b00011110:
case 0b00111110:
case 0b10011110:
case 0b10111110:
    return TileType.Up_0001;
// * 0 *
// 1 x 1
// 0 1 1 (Up_0010)
case 0b00011011:
case 0b00111011:
case 0b10011011:
case 0b10111011:
    return TileType.Up_0010;
// * 0 *
// 1 x 1
// 0 1 0 (Up_0000)
case 0b00011010:
case 0b00111010:
case 0b10011010:
case 0b10111010:
    return TileType.Up_0000;
Now we’ve converted each tile in the level into a classification. Each tile image that Andrew drew corresponds to only one classification, although there can be more than one image for each classification, just to add some more variety. We then select one of the images from each classification and draw it to the screen to make up the level. A somewhat more complex level layout might look like this:

Notice how the editor selected the appropriate tiles so that the terrain pieces look connected.
One final step is to add some more decorations to the terrain. We don’t do this in the editor in order to make it easier to see what’s being edited, but when you play the level, we add a bunch of decorative “frill” tiles that surround the whole terrain, like so:
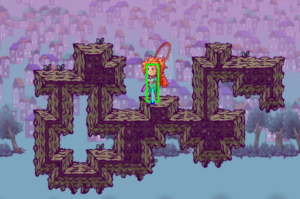
The method for doing this is almost identical to the terrain generation, where Andrew drew a bunch of these “frill” tiles, we created a mapping of those images to a classification, then chose one based on the tile bit mask within the level. Note that these additional tiles are purely for decoration and don’t add anything to the actual walkable terrain geometry.
Andrew is working on a few additional tile sets for different parts of the levels, but they all work the same way. Only the actual images themselves are different.
This method of editing terrain makes creating levels very quick and easy for the level designers. They don’t have to worry about selecting the right tiles for the right places, they just paint the ground and the level editor figures out the rest.